Step by Step guide to navigate to views within WDA component.
Moving from one view to another is referred as navigation in Web Dynpro. In the context of classical Dynpro, it’s moving from one screen to other which is achieved by CALL SCREEN and LEAVE TO SCREEN statements. In Web Dynpro this is achieved using Inbound plug, Outbound plug and Navigation links. Defining an inbound plug for view means the view can be called in by other views. On the other hand, defining outbound plug means view can call other views. It’s like entry and exit points.
What plugs does not define is who i.e. which view will call or will be called. That’s where navigation links come in the picture. Navigation-link connect and outbound plug to inbound plug as seen in the picture below.

In this example, we will create a Web Dynpro component to demonstrate how navigation is achieved within WDA component.
Create Web Dynpro Component and Service Call to BAPI_FLIGHT_GET_DETAIL
Define Views
View V_MAIN
Create View – V_FLIGHT_DATA
Create view V_ADDITIONAL_INFO
Create view V_AVAILIBILITY
Navigation
Embed V_FLIGHT_DATA in V_MAIN
Define plug in V_MAIN
Define plug for view
Define Navigation Links
Create Application
Test Web Dynpro using Web Dynpro Application
Search Function
Create Web Dynpro Component and Service Call to BAPI_FLIGHT_GET_DETAIL
In SE80 create a new Web Dynpro Component .

Create service call to BAPI_FLIGHT_GET_DETAIL

You should have a service call method in component controller (unless you choose to create service call in new custom controller) and context that looks like below screen shot.

Define Views
View V_MAIN
To let V_MAIN access context of component control we need to defined component usage in V_MAIN. Go to view V_MAIN and define component controller usage.

Go to Context tab of view and drag drop importing and return node from right pane to left. In this view we are only going to put input criteria and display any error message so only need IMPORTING and RETURN node here in context. Context values are always overhead on web Dynpro component therefore keep nodes to minimum.

Go to layout right click on ROOTUIELEMENTCONTAINER and insert element Group

We will create input form within group selection using Create Container Form option


Press OK.
You should now have input fields on layout.
I have changed layout of Group to Matrix layout and rearranged element to look in order. Now add a search button.

This is how layout looks like after button.

Notice that search button is greyed out it because we hav’t completed definition of onAction event. Its like adding button in module pool screen without giving a function code to it.
Define onAction


Enter action name and a description. You could link this to outbound plug here but let’s just leave it at the moment. After this step you will notice Search button is now activated and a method is inserted under Actions tab of layout.
Now insert few more UI element as shown in below screen shot


View should look like this

Create View – V_FLIGHT_DATA


Define component usage and map


Tip : Change layout to of Flight_Data to GridLayout and colCount to 2
Create form using Create Container form within Flight_Data tray for Context node FLIGHT_DATA


Create view V_ADDITIONAL_INFO

Define used component and context mapping


Within ADDITIONAL_INFO group create container based on context.


Create view V_AVAILIBILITY


Insert a group, create container form within group and insert button.

Navigation
Now that we have all views in place we will concentrate on navigation and how views will be displayed at runtime.

V_MAIN is default view which will be displayed in window W_MAIN. View V_FLIGHT_DATA is embedded in V_MAIN using ViewContainerUIElement. ViewContainerUIElement is like a sub-screen area which you can embed views. Then we will create two outbound plugs (red arrows) which will help us navigate to view V_ADDITIONAL_INFO and V_AVAILIBILITY using navigation link (black arrows). We will link these navigation links on button onActionEvent.
Embed V_FLIGHT_DATA in V_MAIN


Define plug in V_MAIN


Define plug for view


Define Navigation Links
First add views V_ADDITIONAL_DATA and V_AVAILIBILITY to window W_MAIN by dragging and dropping views to W_MAIN node.

Link OUT_ADDITIONAL_INFO of V_MAIN to IN of V_ADDITIONAL_INFO


As there is only one inbound plug IN in view its automatically filled up, otherwise you can do value help in Inbound plug input and choose inbound plug within view to define target of this navigation link

You should now see a link icon under OUT_ADDITIONAL_INFO outbound plug

Similarly define following navigation link
1. Between OUT_AVAIL and IN of V_AVAILIBILITY.
2. Between OUT plug of V_ADDITIONAL_INFO and IN_MAIN
3. Between OUT plug of V_AVAILIBITY and IN_MAIN

Well plugs are mapped using navigation link.
In next step we will link outbound plug to button which will complete the whole flow.

Earlier we defined onAction events on buttons which created Action methods in view. This is where we will call outbound plugs.
Go to Action tab of view V_MAIN and double click on action ON_ADDITIONAL_INFO. Now use web Dynpro code wizard to generate code this navigation code.

Code will look like this now.
METHOD onactionon_additional_info .
   wd_this->fire_out_additional_info_plg( ).
ENDMETHOD.
Repeat this for other actions to link them to outbound plug.
METHOD onactionon_availibility .
   wd_this->fire_out_avail_plg( ).
ENDMETHOD.
And in view V_ADDITIONAL_INFO view
METHOD onactionon_back .
    wd_this->fire_out_plg( ).
ENDMETHOD.
And in view V_AVAILIBILITY
METHOD onactionon_back .
    wd_this->fire_out_plg( ).
ENDMETHOD.
Activate all objects in Web Dynpro.
Create Application


Test Web Dynpro using Web Dynpro Application
You should have all navigation working fine as shown in below screen.

Search Function
Although our navigation are in place our application is still missing it function i.e. Search airlines.
Make all these input readonly.
On V_MAIN make input under ‘Input Selection Criteria’ mandatory by changing state property to required

Just make field by required does not actually stop any navigation if fields are empty, as you would assume based on behaviour in classical Dynpro. Here in Web Dynpro we need manually check this, however there is a predefined method of class CL_WD_DYNAMIC_TOOL which will do this for us.
Best place to put this check is in hook method WDDOBEFOREACTION of view V_MAIN. Actually most of the code is already there, you just need to comment it and add a call to method CHECK_MANDATORY_ATTR_ON_VIEW.
METHOD wddobeforeaction .
  DATA lo_api_controller TYPE REF TO if_wd_view_controller.
  DATA lo_action TYPE REF TO if_wd_action.

  lo_api_controller = wd_this->wd_get_api( ).
  lo_action = lo_api_controller->get_current_action( ).

  IF lo_action IS BOUND.
    CASE lo_action->name.
      WHEN 'SEARCH' OR 'AVAILIBILITY' OR 'ADDITIONAL_INFO'.
        CALL METHOD cl_wd_dynamic_tool->check_mandatory_attr_on_view
          EXPORTING
            view_controller = lo_api_controller.
    ENDCASE.
  ENDIF.
ENDMETHOD.
Call service call using web Dynpro wizard

METHOD onactionon_search .

*----------------------------------------------------------------*
* Call component controller method - code using web dynpro wizard
*----------------------------------------------------------------*
  DATA lo_componentcontroller TYPE REF TO ig_componentcontroller .
  lo_componentcontroller =   wd_this->get_componentcontroller_ctr( ).

  lo_componentcontroller->execute_bapi_flight_getdetail(  ).

*----------------------------------------------------------------*
* Read context attribute - Using code wizard
*----------------------------------------------------------------*

  DATA lo_nd_return TYPE REF TO if_wd_context_node.
  DATA lo_el_return TYPE REF TO if_wd_context_element.
  DATA ls_return TYPE wd_this->element_return.

* navigate from <CONTEXT> to <RETURN> via lead selection
  lo_nd_return = wd_context->get_child_node( name = wd_this->wdctx_return ).

* get element via lead selection
  lo_el_return = lo_nd_return->get_element(  ).

* get all declared attributes
  lo_el_return->get_static_attributes(
    IMPORTING
      static_attributes = ls_return ).

*----------------------------------------------------------------*
* Display error message - Using code wizard
*----------------------------------------------------------------*

  IF ls_return-type = 'E' .
*   get message manager
    DATA lo_api_controller     TYPE REF TO if_wd_controller.
    DATA lo_message_manager    TYPE REF TO if_wd_message_manager.

    lo_api_controller ?= wd_this->wd_get_api( ).

    CALL METHOD lo_api_controller->get_message_manager
      RECEIVING
        message_manager = lo_message_manager.

*   report message
    CALL METHOD lo_message_manager->report_error_message
      EXPORTING
        message_text      = ls_return-message
        cancel_navigation = abap_true.

  ENDIF.

ENDMETHOD.
Display availability view in popup widow
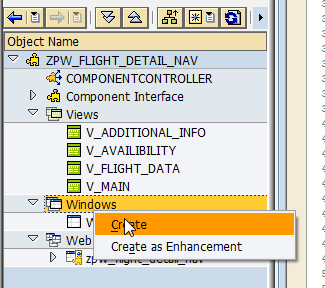
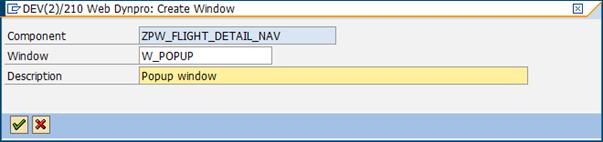
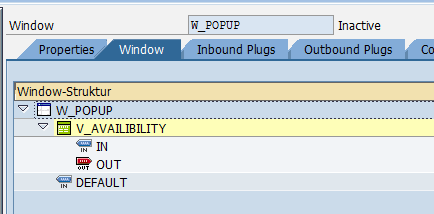

Goto code generation wizard

METHOD onactionon_availibility .
*  wd_this->fire_out_avail_plg(  ).

  DATA lo_window_manager TYPE REF TO if_wd_window_manager.
  DATA lo_api_component  TYPE REF TO if_wd_component.
  DATA lo_window         TYPE REF TO if_wd_window.

  lo_api_component  = wd_comp_controller->wd_get_api( ).
  lo_window_manager = lo_api_component->get_window_manager( ).
  lo_window         = lo_window_manager->create_window(
                     window_name            = 'W_POPUP'
                    title                  = 'Availability Information'
                     message_display_mode   = if_wd_window=>co_msg_display_mode_selected
                     button_kind            = if_wd_window=>co_buttons_ok
                     message_type           = if_wd_window=>co_msg_type_none
                     default_button         = if_wd_window=>co_button_ok
                     ).

  lo_window->open( ).

ENDMETHOD.
And the end result

