In this two part series I will explain how to configure FPM(Floor Plan Manager). This blog is more suited for beginners who are trying their first FPM configuration. First we will configure without using ACT(Application Creation Tool). ACT is one screen application tool which will create all FPM configuration objects in one go. In second part of blog I’ll show you how to use ACT.
First thing first, we need a Web Dynpro.
1. Create Web Dynpro with two Views and two Windows
I have created a Web Dynpro with two views VIEW_GENERAL_DATA and VIEW_DIMENSION_DATA and two windows WIN_GENERAL_DATA and WIN_DIMENSION_DATA.

View VIEW_GENERAL_DATA is embedded in window WIN_GENERAL_DATA and view VIEW_DIMENSION_DATA is embedded in window WIN_DIMENSION_DATA.
I have service call MATERIAL_GET_DETAIL to BAPI_MATERIAL_GET_DETAIL with importing parameter as material and BAPI’s exporting parameter GENERAL_DATA and RETURN mapped to context. You can use wizard to create this service call. See Service call link for details of how to create service call.

In the WDDOINIT method of component controller I have called method MATERIAL_GET_DETAIL with material number so we have some data to display in views.

Map context of Component controller to context of view VIEW_GENERAL_DATA and use option ‘Create Container Form’ in Layout tab of view VIEW_GENERAL_DATA to create read-only fields to display information as shown in below screen shot.

Similarly create layout of view VIEW_DIMENSION_DATA.

For FPM to access your Web Dynpro component you need to implement one of building blocks interfaces. In this case we are going to implement interface IF_FPM_UI_BUILDING_BLOCK. Double click on Web Dynpro component and under ‘Implemented interface’ tab add this interface and click on ‘Reimplement’ button in ‘Action’ column , it should go green.

At this point check syntax and activate Web Dynpro.
2. Config FPM without ACT
2.1. Create Web Dynpro Application
Right click on your Web Dynpro and choose Create->Web Dynpro Application. Enter name and Description.

Enter FPM_OIF_COMPONENT, FPM_WINDOW and DEFAULT in Component, Interface View and Plug name respectively.
Note that usually you would enter your own Web Dynpro component name in ‘Component’ Window but in case of FPM this would be name of FPM component you are going to use. I am going to use Object Instance Floorplan and Web Dynpro component name of this Floor Plan is FPM_OIF_COMPONENT.
Floorplan components are SAP delivered components that serve are the entry point into a floorplan application. Each of these components defines a floorplan, which model common UI design patterns that you may find across SAP’s technology platform. Currently four types of floorplans are provided that are implemented in three WDA components.
| Object Instance Floorplan (OIF) | FPM_OIF_COMPONENT |
| Guided Activity Floorplan(GAF) | FPM_GAF_COMPONENT |
| Quick Activity Floorplan(QAF) | FPM_OIF_COMPONENT |
| Overview Page Flooplan(OVP) | FPM_OVP_COMPONENT |

Save Web Dynpro application.
2.2. FPM Application Configuration
First find your Web Dynpro application.
Since application refers to Web Dynpro FPM_OIF_COMPONENT you won’t see Web Dynpro application under Web Dynpro ZPW_FPM_DEMO1. You can either open Web Dynpro FPM_OIF_COMPONENT and find your application there under node ‘Web Dynpro Applications’ or open package(in which you have saved Web Dynpro application) in SE80 and navigate to applications from there. Either way once you have found Web Dynpro application right click on it and select ‘Create/Change Configuration’

This will open ‘Editor for the Web Dynpro ABAP Application Configuration’.
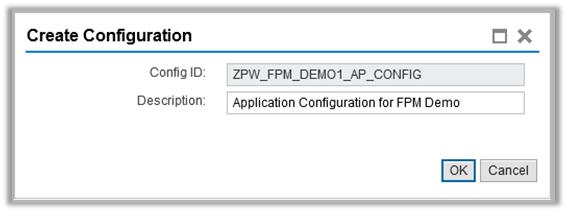
Enter a name in Configuration ID and press ‘New’ button. Note that Configuration IDs are global so name accordingly.

Enter description and press OK.
On next dialog box specify package.
Now you have configuration in place. For Object Instance Floorplan you also need to create configuration for Identification area and content area. Identification area is where your application heading and messages will appear and context area is where we are going to display our views.
2.3. Floorplan (Component) Configuration FPM
Select first line and click on ‘Assign Configuration Name’
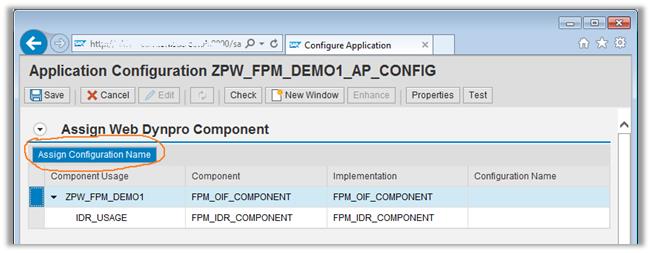
Specify name on Configuration ID.

Repeat for IDR_USAGE

At this point you should have configuration names in these lines. Press save, you should get message that these configuration does not exist that’s ok as we haven’t created them yet.

Click on configuration ZPW_FPM_DEMP_CONFIG1 to create it by specifying description and package. Object Instance Floorplan contains tabular display and here we are going to define tabs and where our view will appear.
I have specified Web Dynpro component as ZPW_FPM_DEMO1 and view WIN_GENERAL_DATA and tab title as highlighted in below screen shot.

Let’s insert another main tab. Use button ‘Main View’ to insert new tab.

Specify tab title and view to display in tab.

At this point you can check, save and test.

There you go; you have two tabs General Data and Dimension with respective views displayed in it. Notice it says No title provided it is because we haven’t created it yet.
2.4. Header (IDR) Configuration
In configuration screen click on ZPW_FPM_DEMO1_AP_CONFIG to go back to previous screen.

Click on IDR_USAGE configuration ZPW_FPM_DEMO_IDR_CONFIG. Specify description and package to create it.

Specify application title and optional tooltip. Save and test. You should now have application title.
Just to summarise we created following objects as part of FPM Configuration
1. Web Dynpro Application
2. FPM Application Configuration
3. Floorplan (Component) Configuration FPM
4. Header (IDR) Configuration
One Reply to “Configure FPM with and without ACT – Part 1”